|

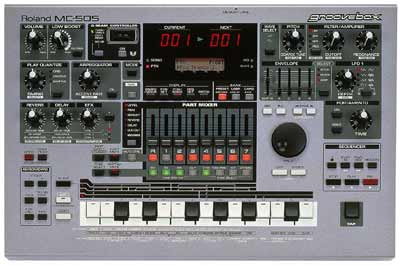
ROLAND MC-505 Groovebox
The MC-505 Groovebox builds upon the successful MC-303 as a self-contained, retro-styled dance music sequencer and sound module with powerful new sounds and realtime controls.
Features include:
. High performance sound engine with 64 voice polyphony
. Multi-mode resonant filters
. Front panel ADSR envelope controls
. Revolutionary D-Beam Controller for effects and sound/note control via hand movement over an infrared light beam
. 714 onboard dance music Patterns
• 512 built-in sounds and 26 rhythm sets.
• 3 independent effects processors
. MEGAMIX function allows for intuitive pattern creation by combining rhythms and Parts of one Pattern with another
. Enhanced MIDI implementation
• 6 Audio Outputs
. Low Boost circuit with octave control provides low end punch
• Uses Smart Media cards for external Pattern and Patch
storage (512 Patches/200 Patterns on a single card).
• Onboard sequencer capacity increased to 95,000 notes
(up to 480,000 notes on a 4MB Smart Media card).
Restoring Factory Settings
1) Hold SHIFT and turn the power on.
2) Press ENTER.
Note: The procedure takes approximately 4 minutes
Playing the Demo Songs
1) If the MC-505 is playing, press STOP.
2) Simultaneously press EXIT and ENTER.
3) Use the VALUE DIAL to select a demo song.
4) Press PLAY to start playback.
5) Press STOP to end playback. Press EXIT to leave the Demo Mode.
Playing Patterns
The MC-505 contains 714 onboard preset Patterns. Use the following procedure to play these Patterns.
1) Press MODE so that the PTN indicator lights.
2) Press PTN/SONG in the DISPLAY section.
3) Press PRESET in the BANK section.
4) Use the VALUE DIAL to select the desired Pattern.
5) Press PLAY. While the Pattern is playing, you can
use the VALUE DIAL to select the next Pattern.
6) Press STOP to halt playback.
Using the Mute Function
Use the following procedure to mute any Part of a Pattern while it is playing back:
1) Select a Pattern and press PLAY.
2) Press PART MUTE so it is lit.
3) Press the PART BUTTONS (R-7) to Mute the
selected Part. The PART BUTTON will blink.
4) Press the PART BUTTONS (R-7) again to activate
the selected Part.
Modifying Sounds in Realtime
Use the following procedure to modify the sound you are currently playing using the front panel controls:
1) Press PART SELECT so it is lit.
2) Use the PART BUTTONS (R-7) to select a Part.
3) Play the keyboard pads and the selected Patch will
sound. Use the OCTAVE -/+ buttons to shift the Patch
down or up.
4) Rotate the CUTOFF knob as you play the keyboard pads.
5) Experiment with the RESONANCE, LFO DEPTH, and PORTAMENTO knobs.
6) Now try changing the ENVELOPE A, D, S and R sliders.
Note: You can use the same controls to modify a Part that is playing back in a Pattern.
Using the Arpeggiator
Use the following procedure to activate the Arpeggiator:
1) Use PART SELECT and the PART BUTTONS (R-7) to select a Part.
2) Press ON (in the arpeggiator section) so it is lit.
3) Hold down several keyboard pads and the sound will cycle between them.
4) Hold SHIFT and press keyboard pad #1.
5) Use the VALUE DIAL to select other arpeggio styles.
6) Press EXIT to return to the main screen.
Using MegaMix
MegaMix allows you to select Parts from different Patterns and combine them in realtime. Use the following procedure:
1) Select Pattern ”P:133 HipHop East 1” (as described
previously) and press PLAY to begin playback.
2) Press MIXER SELECT (above MUTE CTRL)
repeatedly until the MEGAMIX indicator is lit.
3) Press PART SELECT so it is lit.
4) Use the PART BUTTONS (R-7) to select a Part and the VALUE DIAL to select the desired Pattern. You can have up to 8 tracks playing musical information from different Patterns.
Using the D-Beam
Use the following procedure to activate the D-Beam:
1) Select a Pattern and press PLAY to begin playback.
2) Press ON in the D-Beam section so it is lit.
3) Use the D-Beam select button to select “TURNTABLE.”
4) With the Pattern running, slowly lower and raise your hand above the D-Beam lens.
5) Hold down the D-Beam select button and use the VALUE DIAL to select other options.
6) Press STOP when you are finished.
Note: Some DBeam settings will affect only the currently selected Part and some will affect the whole Pattern.
* D-Beam controller technology has been licensed from Interactive Light, Inc.
|
|