|

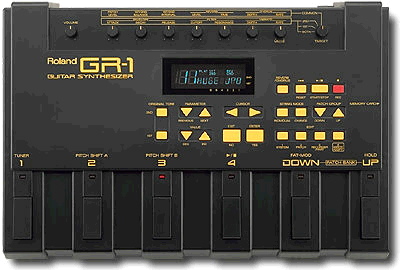
The Roland GR-1 is the guitarist's guitar synthesizer. The user-friendly, floor-module design with lightning-fast tracking allows performers to take advantage of the 200 CD-quality sounds – designed exclusively for guitarists.
The onboard digital reverb and chorus add the professional touch whether playing live or using the 2,000 note sequencer.
• Initializing
1) Turn power off.
2) Hold WRITE / COPY while turning on.
3) Press ENTER YES.
• Playing patches
1) Press BANK footswitch (bank number flashes).
2) Press footswitches 1 through 4.
3) Press GROUP UP, and repeat above to access the second group of 32 patches.
Note: The first eight patches (bank 1-1 through bank 2-4) are demo patches of the quickest tracking sounds and give an idea of the GR-1 sonic capabilities.
• Auditioning Tones
1) Choose patch 1-1
2) Press 1ST TONE
3) Use DEC/INC buttons or VALUE knob (vibrato rate) to choose any of the 200 tones.
4) Press EXIT when done
• Layering Tones
1) Choose patch 3-1 "GRAND."
2) Press string mode select CHANGE until 1ST and 2ND both appear.
3) Strings are automatically selected. Press 2ND TONE and use INC / DEC to choose new 2nd tones.
4) Press EXIT when done.
• Layering Guitar
1) Choose patch 1-4 (group 1) "SCATIN."
2) Put GK-2 switch on MIX and play jazzy riffs.
3) Choose patch 4-2 "BIG STGS."
4) Layer clean guitar sound and play chords.
5) Choose patch 2-1 "FEEDBACKER."
6) Layer metal guitar sound with it
• Quick edit-tones
1) Choose patch 2-4 "GIT+STGS."
2) Put TARGET knob on 2ND.
3) Turn ATTACK slightly counterclockwise to speed it up.
• Quick edit-effects
1) Put TARGET knob on COMMON.
2) Turn LEVEL and TIME clockwise to hear more reverb.
• Show splits and v-switcht/V-Mix modes
1) Choose patch 6-1 in GROUP 2 "BEAT KIT."
2) Choose patch 7-3 in GROUP 2 "BASS>PNO."
3) Choose patch 4-1 in GROUP 1 'V-SW STNGS.'
• Playing the Sequencer demo
1) Press START/STOP
• Playing along with the sequencer
1) Let sequencer continue after demo song.
2) Choose patch 3-4 "ROCK BEE."
3) Play along with demo.
• Recording a quick sequence
1) Turn unit off.
2) Press and hold EXIT/NO while turning on (song init OK ?).
3) Press ENTER (reboots).
4) Press RECORDER/PART.
5) Press ENTER/YES, the display reads "1-2-3-D-." These are the 3 parts and drums. The part with the flashing underline is the one selected to record. The CURSOR takes you to other parts.
6) Press ENTER/YES.
7) Press REC.
8) Press START/STOP. You'll hear 2 bars in and the recording begins at the 3rd bar.
9) Press START/STOP when you done recording.
10) To play, press START/STOP.
By pressing EXIT, you will be returned to the track select screen to select another part by cursoring to it.
|
|